Warren Moore for many years had the text for the article shown below on "Stuffing Box Maintanence" located on his website of www.MooreMarine.com. Mr Moore has since deactivated that website and is now a real estate agent. I had saved a copy of his web page so I have added a couple of additional graphics and am reposting it here. Mr. Moore web page was a reposting of an article from the magazine "Better Boat".
During my years at the boatyard, one of the most feared of all the systems on vessels was the common stuffing box. We had numerous frantic calls after hours, and, in one case, a vacation aborted due to this falsely perceived "harbinger of disaster". I guess its mystery lay in the fact that a certain amount of judgement and experience was needed in its servicing and adjustment. My opinion is that a stuffing box, such as the one pictured below, is a very simple piece of equipment which is easy to maintain and will offer years of service for literally pennies per year. Sometimes the world just doesn't necessarily need a better mousetrap! However, I do feel that every person who owns an inboard boat which is equipped with this type stuffing box should familiarize himself/herself with its proper service and adjustment. The following article is from the publication, "BETTER BOAT," from April of 1985 and is one of the best I have ever seen on the subject. So, jump in and get your feet wet. If you are not already, pretty soon you'll be a stuffing box expert.
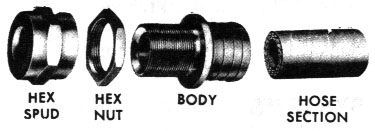
Thanks to Buck Algonquin for the graphics below.
Stuffing Box Maintenance
While stuffing box replacements such as the Lasdrop (BB, October 1984) and Lowell Zabel's homebuilt system (BB, March 1985) are likely to prove increasingly popular in the future, most boatowners with inboard engines must deal with the realities of the conventional stuffing box. While the stuffing box is relatively foolproof, it does require routine maintenance to operate properly, and to avoid damage to drive train components.
The most common complaint about stuffing boxes is leaking, and the most common cure is to torque down on the packing nut a few more turns. While this may serve to stop the leaking, it may also result in damage to the propeller shaft, particularly if the shaft is bronze.
When you tighten the packing nut of a conventional stuffing box, you squeeze the flax packing tighter against the shaft. While the flax may be softer that the shaft, it can wear a groove into it over time. The groove lets in water, and you tighten the packing nut even further to eliminate leaking, exacerbating the cycle.
The possibility of leaking and shaft wear can be avoided with a minimum amount of routine maintenance, using perhaps a half hour once a year when the boat has been hauled, and pennies of material.
How do you know when to repack the stuffing box? Just assume that it needs it now. If the packing is a year old or more, you won't be wasting your time to replace it, since the job is so simple.
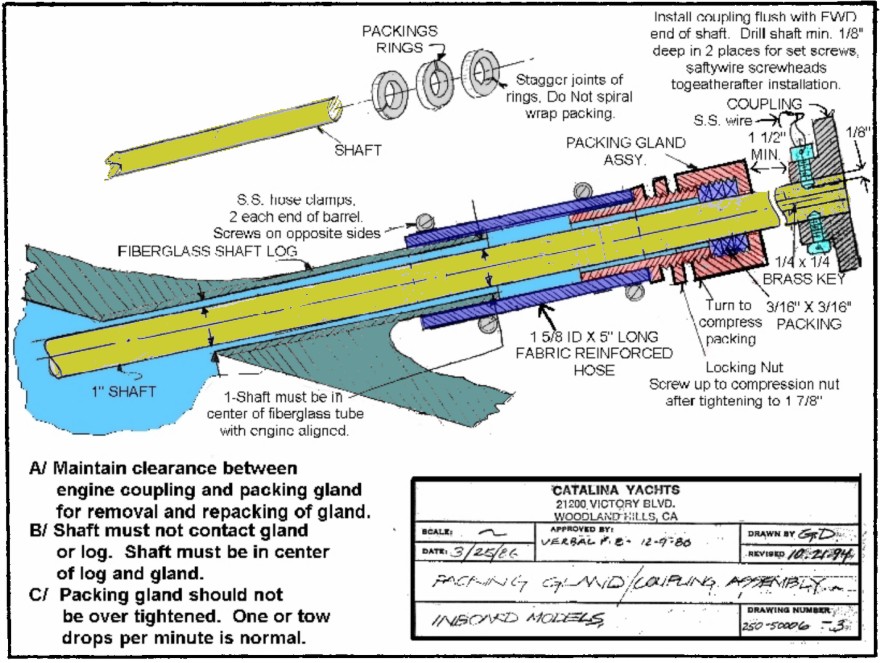
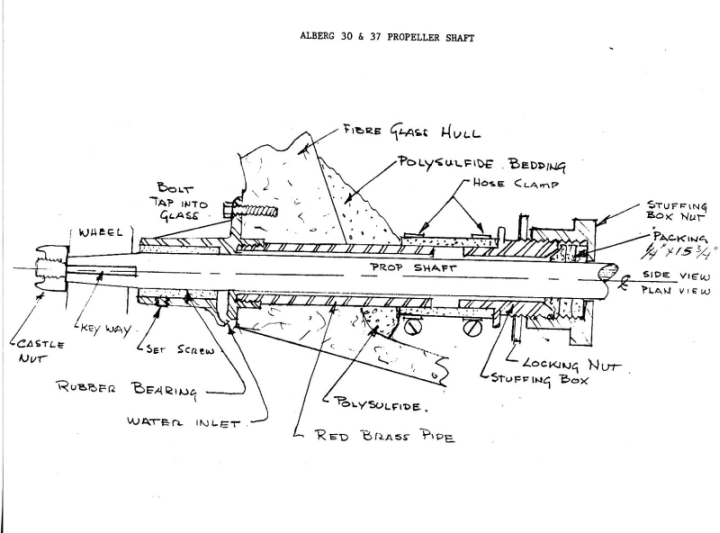
The accompanying drawing shows a simplified cross section of a typical traditional stuffing box. No matter what refinements are seen between competing brands, the basic design and principle is the same. The shaft is sealed by compressing a soft material against it, using a hollow nut. The more you tighten the nut, the more the sealing material is compressed against the shaft.
Over time, the packing dries out, and is worn away by the turning of the shaft. Water gets around the packing, so you tighten down some more on the packing nut. The packing gets smaller and harder, and presses tighter and tighter on the shaft. That nice, soft packing is now hard enough to wear a groove in your propeller shaft.
In an emergency, almost any compressible material can work in a stuffing box, but we're not talking about emergencies here. We're talking the boring, but essential, thing called routine maintenance.
Whatever that frayed, dried-out material looks like that you remove from the stuffing box, it probably began life as a square flax packing. This is a square plaited material, impregnated with a waxy, oily organic lubricant. It comes in various sizes from 1/8" up to 1/2". To determine the size you need, measure the clearance between the shaft and the inside of the packing nut. Do this as carefully as possible, for having exactly the right size packing makes life easier.
Removing the old packing may require some gymnastics. Usually, the stuffing box is located in a dark, tiny place under the cockpit, which may be accessible only by standing on your head in a cockpit locker. In some cases, there is little clearance between the transmission coupling and the stuffing box, making life even more difficult. That's why stuffing boxes get neglected, and that's why shafts get worn out.
First, back off on the lock nut which holds the stuffing box adjustment. It's only necessary to back off a little. Next, back the packing nut completely off the threaded neck of the stuffing box.
The next job is to dig out the old packing. The ideal tool is thin, so that it can be slipped between the shaft and the packing nut. It has a hook on the end, so you can grab onto the old flax packing. And it's soft enough not to score the shaft while you're digging around. Frankly, we've never found that ideal tool. Instead, you can settle on a fairly long, thin screwdriver, which will do the job if you're careful.
Be sure to dig out all the layers of packing. The last one may be so hard that it's difficult to distinguish from the bronze packing nut.
If you've scratched the shaft, or if it's heavily oxidized, it's a good idea to polish the shaft where the packing will rest against it. You can do this with fine silicon carbide (wet or dry) sandpaper, used wet. When the shaft is clean and bright, thoroughly wash it with water to eliminate all traces of abrasive, which could quickly score the shaft if not removed. Then, grease the shaft lightly to make it easier to slide the repacked nut into position.
The packing should be installed in layers, rather than a continuous spiral. The length of each piece of packing is fairly critical. There should be no gap at the ends when the packing is wrapped around the shaft. Use as many layers of packing as will fit in the packing nut and still allow the nut to be threaded onto the neck of the stuffing box. Gently force each layer into the packing nut with a screwdriver, being careful not to cut the packing.
Stagger the joints in the layers of packing, so there is no possibility of leaking. When the packing nut is full - there should be a minimum of three layers of flax packing - tighten the packing nut by hand as far onto the neck of the stuffing box as you can. Then, back off on the nut, and check the packing to see that it has seated evenly inside the nut. It may now be possible to add another layer of packing, if the layers have compressed enough.
Retighten the packing nut by hand. Do not use a wrench or pliers. The packing nut should only be tight enough to stop leaking. Any tighter, and you risk damage to the shaft, and gain nothing.
When the boat is launched, immediately check the stuffing box for leaking. If there is leaking, use a wrench to tighten the packing nut, but only until the leaking stops - no more. Then, tighten down on the lock nut, using two wrenches - one to keep the packing nut from being tightened down further, one to tighten the lock nut.
Run the engine with the gearbox engaged. A slight drip - one drop every minute or so - is fine, but not necessary if the box is adjusted just right. Keep an eye on the stuffing box for a while, as it may develop a slight leak as the packing wears in. If a leak develops, tighten slightly - very slightly.
There is no hard and fast rule about how frequently to repack a stuffing box. On the average sailboat, the engine rarely gets enough hours to actually wear out the packing. But packing does harden over time, and its effectiveness is reduced. You're better off repacking based on the time since it was last done, rather than the number of hours the engine has been run.
Unless your sailboat spends a lot of time under power, you can get away with repacking every other year. Powerboats will minimize the risk of shaft damage by repacking yearly. Repacking the stuffing box isn't very glamorous, but it's an essential part of routine maintenance. Neglect it, and we guarantee you'll regret it, since a dollar's worth of flax packing is always cheaper than a new shaft.
Thanks to "BETTER BOAT" for the reprint of this article.
Note: One handy tidbit that I might add to this article is the use of a small hammer to loosen a frozen stuffing box. It is not uncommon to find the locknut "locked" so tightly against the spud that it is difficult to loosen. Many times, the fact that you are standing on your head and the stuffing box is in an area inconvenient to access with tools large enough to do the job adds tremendously to this problem. Gentle tapping on the "flats" (hex area designed for wrench placement) of both the locknut and/or spud in the desired direction to loosen will break a "sticky" stuffing box. I have never seen this fail. Give it a try. Also, do not neglect the hose connecting the shaft log to the stuffing box. Inspect it for deterioration and verify it to have two (2) high quality, properly tightened clamps at both the stuffing box end and the log end (four clamps total).